Creating a Development / Deployment Virtual Machine with GCE
When creating a Rails app, it is helpful to have a decent roadmap of what you're going to do. An important part of this is where you are going to develop your app, and where you are going to host (deploy) it.
If the answer to one or both of these involves using the Google Cloud Platform, then this guide should help you set yourself up nicely.
This process is rather long and can be tricky, so has been split into sections:
GCP Signup & Project Initialisation
If you don't already have a Google account, this is naturally a prerequisite to getting yourself set up, and you can set one up quickly via
accounts.google.com.
Once you're set up, head over to cloud.google.com,
where there should be a nice Get started for free button, which you can click to get started:

This free trial gives you an impressive $300 of credit to use over 90 days, which should be plenty for completing your learner apps and deciding if you'd like to continue using the service afterwards.
When you are setting up your account, remember to set your account type to Individual:

With this done, we're ready to get started. Google will try to collect some information from you as to your purposes on the platform; feel free to fill these out if you wish, or hit Close at the bottom to skip it. The Welcome page offers a few resources such as a Basics Checklist, however we will skip this just now and make a start.
GCP works in Projects, and the platform will have taken the liberty of generating one for you as part of the signup process entitled My First Project.
You are more than welcome to continue with this project.
However if you'd like something with a snappier name then we can create a new one by clicking on the project's name in the top nav bar and hitting New Project:

From here we can give our new project a name and specify a project ID if we don't like the one Google chooses for us. We can also attribute this to an organisation, which we'll skip for now:

You will be taken back to your Welcome page, and the Notifications panel with appear with the progress of your new project's initialisation:

When the little progress icon (called a throbber - I know...) shows a green tick then you are ready to go! Click the notification and you will be taken your new project's Dashboard, where we can really get started:

Now this may seem a little imposing on your first encounter with it - it certainly was on mine! But never fear; the remaining sections will guide you on the bits you'll need to get the VM and Rails development environment set up.
Service Account Setup
Before we actually get to building our VM, we will need to set up a service account that will be assigned to our VM and has sufficient access to all the things we need it to access. GCP adds individual elements of functionality to our project based on the APIs we enable for it so, if you are planning to develop or deploy using GCP, we will need to find and enable the appropriate APIs in order to allow access to the features we require:
This can be done by navigating to the API Library and searching for them:

Or you can trust that I vaguely know what I'm doing and activate the APIs from the list below:
- Compute Engine API to run virtual machines.
- Cloud SQL Admin API to run SQL instances in GCP.
- Service Networking API so our app can interact with the SQL instance.
- App Engine API to deploy our app to the App Engine.
- App Engine Flexible Environment API to configure the flexible application environment.
- Cloud Build API to build apps in Google Cloud.
- Cloud Resource Manager API to manage interactions between Google Cloud resources (i.e. database).

With these all enabled, we can now create our service account by heading into the Service Accounts page in the IAM interface:

and click the Create Service Account button at the top of this page to set it up:

The first section of the resulting page will get you to create name for your service account, which will also automatically generate an email for it (which you can change if you wish). You can optionally enter a description for the service account for additional information as well:

On clicking Create and Continue, the second step will expand and allow you to add the required roles to the service account. The roles we need to add are:
- Compute Engine Service Agent - allows use and management of VMs.
- Cloud SQL Editor - allows use and management of SQL instances and their databases.
- App Engine Deployer - allows new AppEngine versions to be deployed.
- App Engine Service Admin - allows version control and traffic management of AppEngine versions and instances.
- App Engine flexible environment Service Agent - allows use of the AppEngine flexible environment.
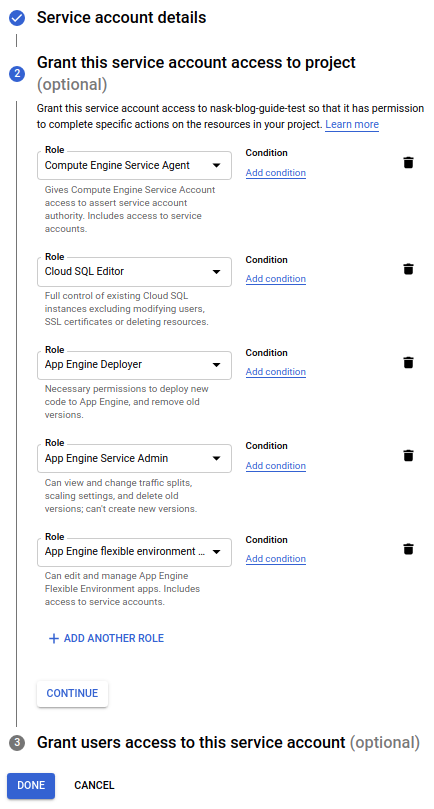
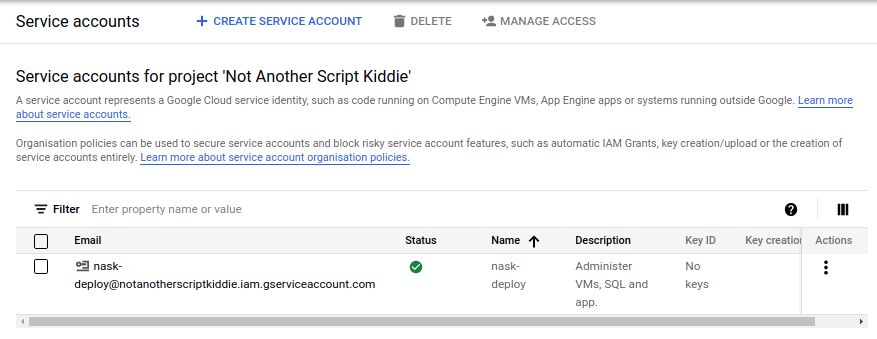
And if you wish to allow other users to use the service account, you can do so here. Now hit Done and this will create the Service Account and redirect you to the service account landing page, where you will see your freshly baked account waiting for you:
Virtual Machine Setup
With our project created and a service user set up, we can now begin doing something with them!
To create our VM we will be using the Compute Engine that you might see in the left-hand navigation bar. Hovering over this will reveal the interfaces available in this engine and, unsurprisingly, we'll need to select VM instances to navigate to the portal:

Clicking on one of the Create Instance buttons will redirect us to the required interface to start setting up our basic development VM.
This interface offers a multitude of setup options, so we'll take it step by step.
We'll ignore the left-hand column for now, which offers options to import VMs from various sources, though the right-hand column is interesting and shows the estimated cost of the options you select if the VM is left on continually.
While we don't need to worry about this for now as we're using free trial credit, it's a handy feature if you later start paying for the service.
Let's start off by giving the VM an appropriate name and configuring the region based on your location, as you'll generally be the one connecting to it - the drop-down handily informs us where the region designations point to, and zone doesn't matter too much (more info can be found here).

Note that these settings are permanent, and if we realise a mistake later then we'll need to create a new VM to rectify it.
The Machine configuration determines how mighty our VM will be.
Feel free to have a nosey through the options presented (particularly how they change the prices on the right-hand side).
However, given that we'll only be using our VM to run our development environment (and possibly code in), we don't need anything too hench
- I find the e2-small machine type offers a happy compromise of power without draining our credit too much:

We can skip the Confidential VM service and Container settings just now and select our Boot disk. By default the interface selects the latest stable Debian operating system, but we'll Change this now:

You are, of course, free to develop in whichever operating system you desire, but in this example we will be using Ubuntu because I like it and it's my blog.
I would suggest using the latest LTS (long term support) release, which at time of writing is 20.04, and keep the Balanced persistent disk type.
With regards to size, the 10GB default should suffice for just building a single basic application, however increasing this to 25GB shouldn't break the bank and will allow a bit more freedom:

With this done, go ahead and hit Select to confirm these options and go back to the Create Instance interface.
In the Identity and API access section, we will here select the service account that we set up earlier from the drop-down. After this, the only remaining option we need to worry about is enabling HTTP traffic through the Firewall which can be achieved by ticking the corresponding box:

Finally we can hit Create to set up this VM, which will redirect you to the VM instances screen, with a new entry in your Instances table displaying a throbber while GCE is creating the VM.

While this is throbbing, let's do the final bit of setup.
By default Rails serves its development server on port 3000, and we will need to open this port on the firewall in order to access it from the web. This can be achieved by navigating to the Firewall page via the VPC Network portal, which displays all of the currently active firewall rules:

All we need to do now is hit Create Firewall Rule at the top and complete the resulting form provided to us, starting with an appropriate name and a description if you're nasty:

We can leave the next few options in their default state, and stop when we get to the Targets field.
Here we will need to specify http-server as our only tag, and in the Source filter section add 0.0.0.0/0 into the Source IP ranges:

Finally, in Protocols and ports, let's tick the tcp box and specify the Rails dev port 3000 in the text box next to it. With this finished, hit Create and we're ready to go:

On being redirected back to the firewall rules table, you should be able to see your new rule nestling comfortably somewhere within and we can head back to our VM instances table, where our VM should have finished spinning up:

We can see by the green tick under the Status column that our VM is ready to rock, and see that we can connect to it in the browser using its External IP when we come to checking our app.
Accessing the VM
All we need to do now is connect to our VM via SSH, which can achieved in a couple of ways.
The easiest of these is using the helpful little SSH button in the VM Instances table,
which will open a pop-up that transfers the correct keys over and then provides a shell environment for you to work in.
Alternatively, if you would prefer to work in a local terminal emulator via SSH, we can set this up in a few easy steps:
-
Create a new SSH key on your local workstation - on Ubuntu this can be achieved using:
and giving it a name identifying its use for GCE access, and either giving it a passphrase or just hitting Enter until you see your key's seminal randomart image.$ ssh-keygen -t rsa -
The output of the above command will have a line telling you where your public key has been saved to - either navigate to this this in a file browser or (on Linux) run:
and copy the entire key to your clipboard.$ cat /path/to/ssh-key.pub -
Now head back into the Compute Engine interface in your browser and select Metadata under Settings in the left-hand navigation menu.
-
From here, select the SSH Keys tab at the top of the page:

-
Hit the Add SSH keys button and you will see a small interface to paste your public key into:
-
You should see the SSH username of your key appear to the left of the window if this key is recognised. If this is the case, hit Save to save your key to your project's metadata, which will allow it to work on all of the VMs in your project!
-
Now all you need to do is head back to your VM instances table, grab the External IP address of your virtual machine and connect to it in your terminal using:
$ ssh {{SSH USERNAME}}@{{EXTERNAL IP}}
## for example:
$ ssh nask@34.105.173.148

With your connection set up, you are now ready to use the VM for whatever purposes you desire!
This concludes the guide to setting yourself up with a VM for your Rails development environment with GCE.
Please remember to switch it off when you have finished with it for the day, to avoid wasting your trial credit!
This can be done by highlighting the VM in your instances table and selecting the Stop button, or selecting this option from the instance's option menu:

This guide was made to supplement a wider section on setting up a Rails development environment. Click here if you would like the remaining instructions on how to get your new VM ready to create a Rails project.
If you have already created your Rails project and wish to deploy it to Google App Engine, click here for instructions on how to deploy your app from your GCP VM.
| Back |

Comments
Post a Comment