Deploying Rails to the GCP AppEngine
This post is a progression from a previous post regarding setting oneself up with GCP,
and a supplement to the deploy section of the Rails 6 guide in this blog.
This post can be used by itself, but it is highly recommended that at the least previous GCP post is read first (particularly to set up the
service account
).
This process is rather long and can be tricky, so has been split into sections:
SQL Instance Setup
Unlike Heroku, the GCP deploy process is a bit more involved and requires more explicit setup of certain features. This guide will use the ToDoList web application created in the Rails guide as a basis for what we are deploying.
We will start by creating our database instance so that our app can interact with data -
as specified in the ToDoList guide, we will use a PostgreSQL database instance.
To do this, let's head into the CloudSQL portal,
which can be found in the Databases section of the left-hand naviation menu:

This view will most likely be empty, so we can simply click on Create Instance in the info panel:

which will direct you to where you can choose which database type you wish - select Choose PostgreSQL:

From here we can set up our SQL instance to our required specification which, starting with the basic information and region settings.
Note that we are not creating the actual database in this step, just the environment that it will exist in.
Enter an ID for the instance, a password for the default user (postgres), making sure you note this down somewhere safe..
If you wish, change the version of PostgreSQL being used (the default, latest, one will suffice in this case).
Now select the region you want the instance to be hosted in, and specify whether you'd like the zone to change if your preferred one becomes unavailable:

Opening the Configuration Options will reveal several... options that we can... configure:

-
Starting with Machine Type, this entirely depends on how busy your database(s) will be
- in this instance it will only be us using it so we can afford to go for the least beefy option:

-
With regards to Storage, this again will be dependent on circumstance and usage.
Our ToDoList app isn't going to use much in the way of data and doesn't need to be hugely quick, so an HDD with the lowest capacity will do nicely:

-
The Connections configuration should allow for Private IP connections, as we will be deploying the app within GCP.
The Public IP option can also be checked to avoid any issues later, but is by no means necessary here.
Upon selecting Private IP and choosing the default network, a prompt will appear asking you to set up connection:
Clicking this will bring up a modal to the right of the page, asking for an IP range allocation - we can simply select the automatic allocation:
and click Continue. The third option will just confirm what we have entered, so we can now click Create Connection which will throb for a bit before taking us back to the CloudSQL setup page with an indication that the Private IP connection has been successfully configured:

-
Backups configuration will be entirely down to personal preference, in whether you back up your database at all and what time of day this happens:

- The remaining options in the list do not require checking in the same level of detail as part of this guide, however please feel free to do so!
When you think you are done, the Summary panel on the right-hand side will give you a breakdown of the configuration you have selected (though unlike the VMs setup it doesn't give you a handy estimate of the running costs):

With all this done, we can now hit Create Instance and let GCP handle the hard work of setting up our SQL environment, which understandably takes a little while to complete.
AppEngine & Google Cloud SDK
We can use the time while GCP generates the SQL instance to configure an instance in AppEngine and grab the Google Cloud SDK packages we require to deploy to it. We'll start with the former and head to the AppEngine portal, which we can find under Compute in the main navigation menu:

This will direct you to the AppEngine dashboard which, if you're using this guide to build your first app, will be empty and contain a small welcome panel. Click Create Application in this panel:

The resulting interface will allow you to select the zone your app will be hosted in with a handy little map to denote where each region designation points to:
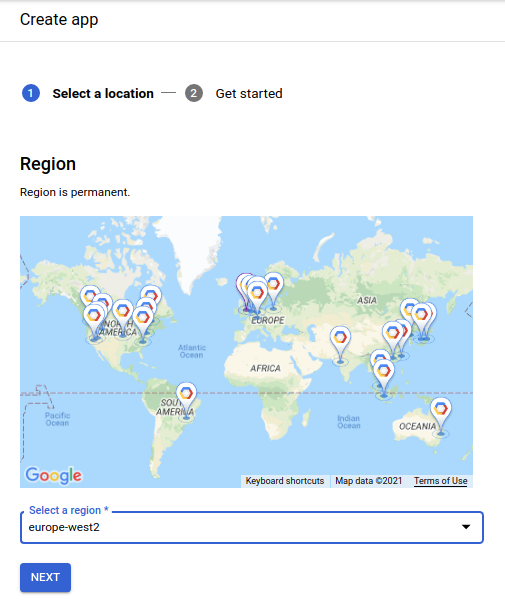
Clicking Next will generate the instance with an obligatory throbber.
When this has throbbed, you will be able to select the language you wish to use (Ruby) and
the environment you wish to configure - in this instance, I recommend the flexible environment:

You will also see a link there to Download the Cloud SDK. If you followed the previous GCP setup guide and are using a GCE virtual machine as your dev environment, you needn't bother with this bit as the packages we need are pre-installed on the VM and your app is already running present and working on it.
However if you didn't then there are two options open to you, to either:
- Install the Google Cloud SDK packages on your local development environment.
- Create a new GCE VM and clone your app to it so it can be deployed from here (probably necessary if you developed your app with an online IDE such as CodeAnyWhere).
|
If you have developed your app on a local machine and elect to install the SDK, this can be simply done by either following the link from the AppEngine confirmation screen and installing the package using Google's instructions, or simpler still by installing the package using the snap repository:
When all this is done, your will receive a confirmation with the name of your configuration (probably |
|
If you have developed your app on an online IDE, or if you would simply prefer not to install the SDK on your local workstation,
you can instead create a dedicated GCE virtual machine to deploy your application.
With your VM set up, we now just need to install the required dependent packages for the Rails app - instructions to achieve this can be found in the Rails Dev Environment Setup post of the Rails guide, however I'm a nice man and will detail them below as well: With our dependencies installed, we need to generate a new SSH key and add it to our GitHub configuration. Details on how to do this can be found in the Version Control section of the Rails guide. Now we can actually clone our app repository onto our new deployment VM, specifying your username and project: The final thing to check is that the app actually runs in the dev environment on your new VM - to do so we first need to make sure the correct developement gems are installed:
And lastly, to make sure our app's development server runs, let's ensure that webpacker (and its npm dependency) has installed for the app:
Finally we can actually check the app runs by starting the server (making sure you followed the firewall step in the VM guide):
and changing the port to
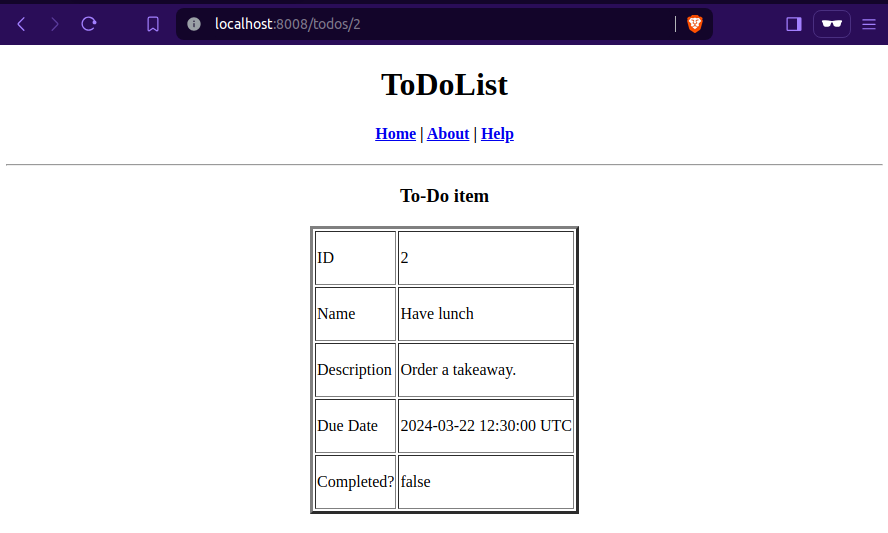
Create a couple of database writes, reads, updates and deletions (by creating To-Do items) to make sure all is well. |


Database Setup
By this point, hopefully our SQL instance will have finished spinning up:
If it has, we will need to generate an actual database inside the instance which we can do, unsurprisingly, from the Databases interface:

This will present a table with all of the active databases within the instance - by default this will only be the system database. Clicking Create Database at the top:

will open up a small modal to the right where we can enter a name for our new database:

Once entered, click Create and wait for the throbber to throb. Upon completion, we will be redirected to the databases table where our new database will be sitting pretty!
App Configuration
With all of our resources set up and our deploy environment sorted, we can now configure our app for deployment! Unlike Heroku, we will need to explicitly configure a few settings using some sensitive information, such as our database password - to do so, we will utilise Rails' native secrets functionality.
If you followed the steps in the previous sections to set up a deployment environment,
please note that we will be working in our development environment for most of this section.
Don't worry, I will try to make it as clear as I can which environment each step need to be actioned in, but if none is specified then please assume it is your development env as opposed the deployment one.
If you are not using a different environment to deploy as you did to develop, then bully for you - you can disregard the distinctions!
Rails stores its secrets in /config/credentials.yml.enc,
which is encrypted using the master key in /config/master.key
- Rails generated both of these files when we ran our new generator to build the app.
We can verify that the master key is working by attempting to edit the credentials in our development environment:
$ EDITOR=vim rails credentials:edit ## choose which editor you prefer, nano might be easiersecret_key_base value.
If you have the incorrect master key, you will receive the following output:
Couldn't decrypt config/credentials.yml.enc. Perhaps you passed the wrong key?$ rm config/master.key config/credentials.yml.enc$ EDITOR=vim rails credentials:edit
With the ability to secure them now verified, we can now safely add our database credentials to the app.
Let's open the editor for our credentials again in your development env:
$ EDITOR=vim rails credentials:editdb) below the base secret key,
adding username & password keys to it and
populating them with the default user and the password that you hopefully noted down when you set up the CloudSQL instance in GCP:
db:
  username: postgres
password: {{CLOUDSQL PASSWORD}}postgres user's table row:

With our database authentication securely stored, we can move onto storing our less-sensitive database name and host information. Because this information won't be particularly harmful if a third-party gets hold of it, we will store these settings as environment variables instead of secrets.
Before we can store them however, we need to ascertain the actual values of these variables!
The name is quite easy, as this will be the name of the database (not SQL instance) we set up earlier.
If you have forgotten this, then worry not!
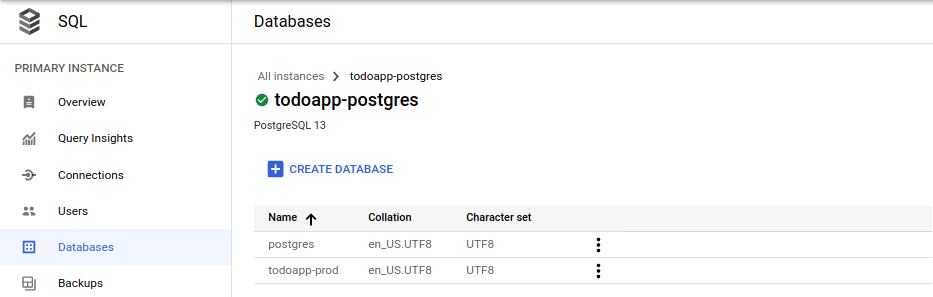
Simply navigate to your SQL instances table,
select the Databases option in the left-hand navigation menu and your database will appear below the default system postgres DB
- in this case it was todoapp-prod:
As for the host value, we have a number of ways of retrieving this:
-
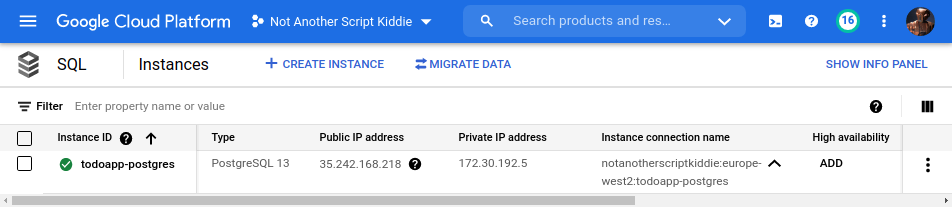
From the Instance Connection Name column of our instance's row in the
CloudSQL Instances table:
-
From the Connection Name in the Connect to this instance info panel of SQL instance's overview page (with a handy copy button!):

-
From the
connectionNamevalue when running adescribeagainst your SQL instance from your deployment environment that has the Google Cloud SDK set up:$ gcloud sql instances describe todoapp-postgres | grep connectionName connectionName: notanotherscriptkiddie:europe-west2:todoapp-postgres
host value is notanotherscriptkiddie:europe-west2:todoapp-postgres
As mentioned before, we will be storing our database's less sensitive data as environment variables.
The AppEngine allows us to set these variable via the configuration file that AppEngine uses to configure itself: app.yaml
We will need to include some other information into this file in addition to our database environment variables:
runtime- specifying that it is a Ruby application.env- the AppEngine environment our application will run in (flex in this case).entrypoint- how to start the application.manual_scaling- how manyinstancesof the app we wish to run (1 in this case, for money's sake).resources- what resource is thrown at your application (lowest possible in this case for money's sake).-
env_variables- all the environment variables we want to set:RAILS_ENV- the Rails environment we want the app to run (production).DATABASE_NAME- the name of our database from above (i.e.todoapp-prod).-
DATABASE_HOST- the connectionName of our CloudSQL instance from above, with the prefix/cloudsql/(i.e./cloudsql/notanotherscriptkiddie:europe-west2:todoapp-postgres).
beta_settings- containing a reference to our CloudSQL instance via the connectionName to set up a proxy so the app can interact with the database.
Let's create the file now in our development environment and populate it with the variables above: /app.yaml:
runtime: ruby
env: flex
entrypoint: bundle exec rails server -p $PORT
manual_scaling:
  instances: 1
resources:
  cpu: 1
  memory_gb: 0.5
  disk_size_gb: 10
env_variables:
  RAILS_ENV: production
  DATABASE_NAME: {{DATABASE NAME}}
  DATABASE_HOST: /cloudsql/{{CLOUDSQL CONNECTION NAME}}
beta_settings:
cloud_sql_instances: {{CLOUDSQL CONNECTION NAME}}app.yaml looks like this:
runtime: ruby
env: flex
entrypoint: bundle exec rails server -p $PORT
manual_scaling:
  instances: 1
resources:
  cpu: 1
  memory_gb: 0.5
  disk_size_gb: 10
env_variables:
  RAILS_ENV: production
  DATABASE_NAME: todoapp-prod
  DATABASE_HOST: /cloudsql/notanotherscriptkiddie:europe-west2:todoapp-postgres
beta_settings:
  cloud_sql_instances: notanotherscriptkiddie:europe-west2:todoapp-postgres
With our AppEngine configuration file sorted, we can now reference these in our app's database config file!
Before we do this however, we should ensure that any existing deployments are not affected by our changes
(for example, if you are following the Rails guide on this blog and
you have Heroku configured to automatically deploy any changes to the main branch).
We will therefore backup our dev env's existing database configuration:
$ cp config/database.yml config/database.yml.std$ cp config/database.yml config/database.yml.gcpproduction group of this file and
reference the required database settings from the credentials and
environment variables, making sure we specify the postgresql adapter.
Let's update our
/config/database.yml.gcp file with all this:
production:
  <<: *default
  adapter: postgresql
  database: <%= ENV["DATABASE_NAME"] %>
  host: <%= ENV["DATABASE_HOST"] %>
  username: <%= Rails.application.credentials.db.fetch(:username) %>
  password: <%= Rails.application.credentials.db.fetch(:password) %>
Our penultimate piece of configuration in our dev env is to add Google's appengine gem to
the bottom of our app's /Gemfile:
gem 'appengine'$ bundle install --without production/Gemfile.lock.
And finally, but not least importantly, we need to tell the deploy process to ignore particular files,
such as the bundler config (which "helpfully" adds the --without environments we specify on the command line into its own configuration),
as well as temporary files and other unrequired modules.
To do this we can generate a file in our development env very similar to the .gitignore file used by git,
and populate it with the relative paths of files and directories we don't want the AppEngine to include in its deploy.
This is imaginatively called the /.gcloudignore:
## ignore the ignore files
.gcloudignore
.gitignore

## ignore git config
.git
.gitignore

## ignore precompiled vendor gems
/vendor/bundle
/public/packs-test
/node_modules

## ignore bundler config and it's irritating environment settings
/.bundle

## ignore temporary and log files, but retain the keep config
/log/*
/tmp/*
!/log/.keep
!/tmp/.keep
/tmp/pids/*
!/tmp/pids/
!/tmp/pids/.keep

## ignore local storage, retaining keep config
/storage/*
!/storage/.keep

## ignore unrequired yarn bits
/yarn-error.log
yarn-debug.log*
.yarn-integrity

## ignore other unuseful and unnecessary files
.byebug_history
Well, that was intense. There are a couple more things to do before we can mosey on over to our deploy environment, but they shouldn't take long.
The primary thing is to make sure all of the changes we have made in our development env are uploaded to our project repository, but making sure we do not upload our master key file:
$ git add app.yaml config/credentials.yml.enc config/database.yml.std config/database.yml.gcp Gemfile Gemfile.lock .gcloudignore
$ git commit -m "AppEngine deploy prep"
$ git push
As a final thought, let's make sure that all of our sensitive data, such as the master key and the database credentials, are stored somewhere. The ideal place for this information is in a secure password/note store such as LastPass, which you can get for free so there's literally no excuse not to!
Deploy the App
Right. Environment setup: check. SQL instance: check. Database: check. App configuration: check.
Let's deploy this thing.
With all of our configuration done, we have but 5 steps to complete before we can initiate the deploy:
-
Pull down the changes we made in our development env into into our deployment environment via
git:$ git pull -
Ensure the new gems are installed in our deployment environment:
$ bundle install --without production -
Make sure we are using the correct database configuration by replacing our existing default
database.ymlwith the one we specially prepared earlier on:$ cp config/database.yml.gcp config/database.yml -
Ensure we have the correct master key file in our deploy env's application file set by simply creating a new
/config/master.keyfile in the deploy env, copying the master key string from your secure password/note store or the dev env, and pasting into your new file before saving and closing it. -
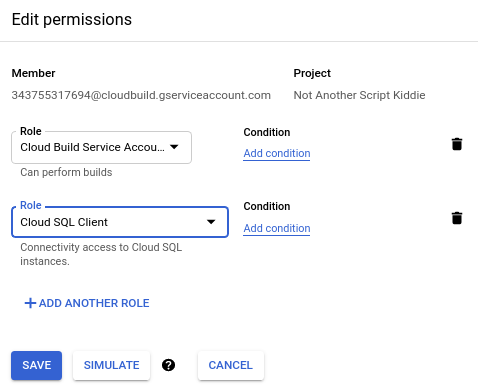
Finally we need to grant the CloudBuild Service Account access to CloudSQL so it can set up the proxy in the AppEngine instance. To achieve this, head into the IAM section of the IAM & Admin section and find the entry in the table that shows the email address ending
@cloudbuild.gserviceaccount.com:
Click the little pencil Edit option in the right-most column of the table row, which will open a little modal on the right of the page. From here, we simply need to add the Cloud SQL Client role and hit Save:
At last, with our final setup complete, we can run the exalted deploy command from the SDK:
$ gcloud app deployWhen the process completes you should see a message like:
Deployed service [default] to [https://notanotherscriptkiddie.nw.r.appspot.com]

You can stream logs from the command line by running:
  $ gcloud app logs tail -s default

To view your application in the web browser run:
  $ gcloud app browse --project=notanotherscriptkiddie

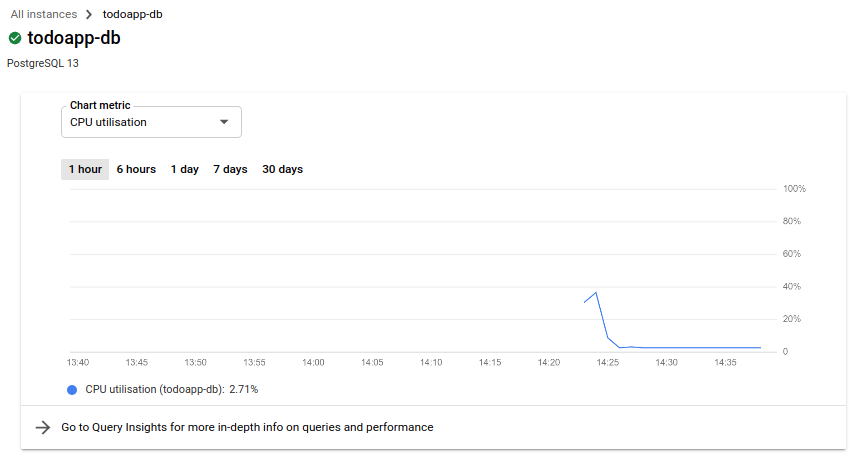
The main graph on this page will likely display no data as we've only just deployed, but will begin to fill up as time and usage are experienced with it.
We can help this along by actively accessing our deployed app, either by the link to the right of the Version drop-down on the Dashboard,
or by navigating to the URL directly, which will be the ID of your project followed by .appspot.com.
For example, in my instance above, it is: https://notanotherscriptkiddie.appspot.com.

Database Migration
The clever amongst you, or those that have opened your app and tried accessing a page that requires a database interaction (i.e. To-Dos index page from our app in the guide),
will notice that we have missed a step: we haven't migrated our database!
To achieve this, we will need to invoke the appengine gem that we added earlier to
run the rails db:migrate command within the app instance.
We already configured the necessary permissions to do this with our CloudBuild service account role edit above,
which is the service account that runs the appengine commands needed to migrate the CloudSQL database.
We can therefore go ahead and run this from our deployment environment:
$ bundle exec rake appengine:exec -- bin/rails db:migraterails executable here because Docker containers don't know about relative executable paths.
Unhelpfully, the output of this in your command line will usually always claim that it has failed once it has run.
However this is only because the shell does not have access to the live logs of this action, and simply assumes the worst.
Luckily the output will first provide a link to these logs in your browser, where the page will receive new log entries in realtime.
When it is finished, if the process is successful, we will see a handsome green tick at the top of the page in the log title.
At the end of the log we should also see confirmation of which command has been run as well its output,
which in this case will be similar to when we run a local database migration:

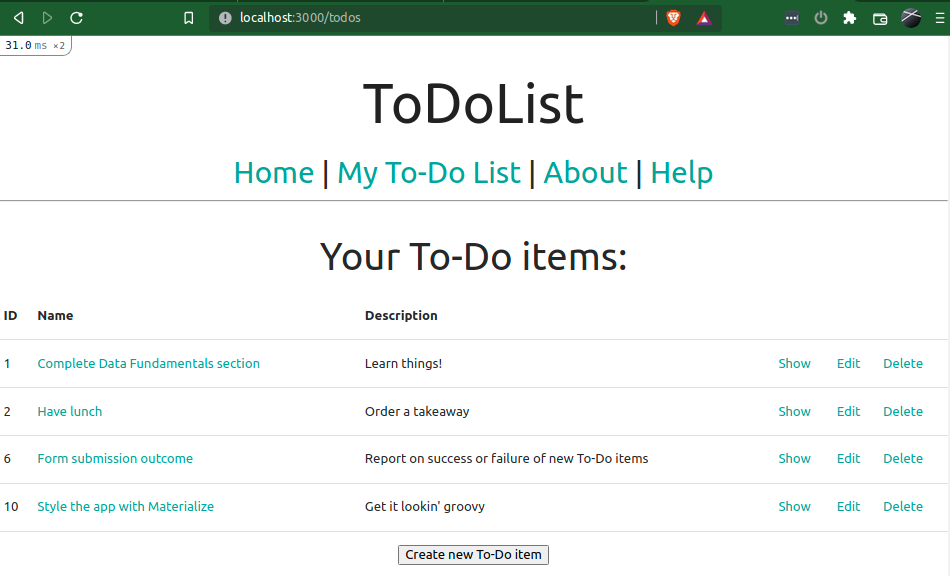
All that remains is to navigate back to the URL your app is hosted on and load an index or any other view that interacts with a database!
And with that you are fully justified in honking like a goose and doing your best impression of an Irish jig,
because you have successfully deployed your Rails app to Google Cloud Platform!!!
Now, I'm not going to lie - some a fair bit a lot the vast majority of this was an utter pain in the arse.
Google's own documentation on setting this up is about as secure as
broadcasting your credit card PIN on Twitter, and other guides have irritatingly specific use cases
(most of which appear to be trying to sell you a particular code check / CI service which circumvents a lot of the complicated bits of the process).
However, I hope my pain in collating and making sense of this abundance of substandard documentation can become your considerable gain,
and that you can use this knowledge for some measure of good.
Anyway, I hope you have enjoyed and learned in equal measure - please check out the other GCP and Rails guide on this blog if you want to learn more from a whiny Britsh nerd. But this has gone on long enough; I need a shit and a glass of water.

| Back |
Comments
Post a Comment