Cloning Your App with Git
Cloning to a New Dev Env
There may come a time when you want to work on your app from another workstation. However, of course, this isn't just a simple case of copying the code to another machine and picking up where you left off!
Rails demonstrates various levels of helpfulness in this regard - it will tell you if it simply needs a database migration to work, however if your webpacker assets aren't there then it will provide decidedly little assistance!
However, following the list of instructions below will almost certainly get you into a place where you can run your local Rails development server and console, and continue working on your lovely app.
Bear in mind that this section will not go into development environment setup, which can be found earlier in this guide here.
Firstly, unsurprisingly, we need the codebase on our local machine. This is made as easy as possible using our friendly neighbourhood version control utility:
git.
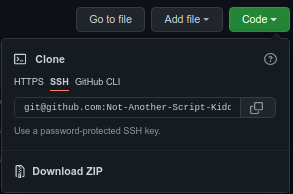
Navigating to your project's GitHub page and hit the Code button, which will open a dropdown with various cloning options. All we need to do is copy the address under the SSH tab:
and then, on our new developmemt environment, pass the address to thegit clonecommand:
If this errors out this may be due to a lack of SSH key that authenticates your environment with the app - see the previous GitHub section for instructions on how to resolve this.$ git clone git@github.com:Not-Another-Script-Kiddie/my_lovely_project..gitWhen the clone finishes, we can change into the project's directory in preparation for the bits we need to run inside it:
$ cd my_lovely_project-
Remember that, if you are developing on a branch of your repository, you will need to switch to this branch:
$ git checkout branch_of_loveliness
-
Remember that, if you are developing on a branch of your repository, you will need to switch to this branch:
We now need to make sure all of our application's Ruby dependencies are present on the environment we are working on. For this, we use the Gemfile that is built and updated with our Rails app, and run the following to install the gems inside it (passing the argument to not install the production gems):
This may ask for a your password a few times in order to access the various areas of the filesystem it needs to.$ bundle install --without productionNext up we need to install the
nodedependencies needed for our webpack assets:
This may take a little while, so be patient!$ npm installWith the dependencies in place, we can actually install webpacker in our app:
$ rails webpacker:installFinally, with all of our assets in place, we can set up our database tables using the migration files in our app:
$ rails db:migrate
With all this done, we can now access the Rails console to check our code and peruse the backend:
$ rails c$ rails s
Comments
Post a Comment