[ToDoList] Setting up the Database
We now have something resembling a website, with pages to display and links to get to them. But this is supposed to be a To-Do List application, which isn’t quite the case just yet. Let’s change that by creating means to handle data.
As briefly hinted at before in the Rails Application Overview,
Rails manipulates data primarily using actions within the CRUD framework (Create|Read|Update|Delete).
These actions are run against Ruby objects that represent individual entries inside our application's database (DB) tables, which are then
governed in our application by models.
In this section we will look at another way in which Rails uses convention to streamline its configuration,
and how we can use this to carry out the first step in getting our application to handle data:
creating a database table to store our creatively named Todo entries.
As we've already established when setting up our views and controllers, conforming to convention allows us to skip a lot of configuration of the MVC framework
- this is no different for database tables and the Rails models that govern the entries inside them.
However in this case, the additional convention is that of grammatical number; the use of plural or singular terms.
You may have noticed that, when we created our PagesController, it was named in the plural - this is the case for any and all
controllers, particularly if we want them to interact with a model [and therefore a database] (e.g. TodosController).
Based on this, you may have already figured out that the database table that the controller hopes to use must also be named in plural
(todos), while the associated model name must be singular to represent individual entries in that table (Todo).
We need to know this when we create the infrastructure to start handling data in our app, so that we don’t confuse Rails and rid it of the magic we want to harness.
| Element | Grammar | Name | Filename |
|---|---|---|---|
| DB Table | Plural |
todos
|
n/a (varies with DB type) |
| Object / Model | Singular |
Todo
|
/app/models/todo.rb
|
| Controller | Plural |
TodosController
|
/app/controller/todos_controller.rb
|
| View | Plural | todos |
/app/views/todos/action_name.html.erb
|
As with controllers, Rails has certain built-in sorcery that will handle most of the creation of models and tables for you using generators.
However, as before, we will do part of this manually first so that you are aware of what these generators actually do.
Let’s start with creating a database table for our Todo entries.
All manipulation of a Rails application’s database structure is done using migrations.
These take the form of files that are written in Ruby and therefore aren’t specific to a single database format,
so you can use the same file between your sqlite development DB and your choice of production DB (e.g. postgresql)!
Migrations should be initially created using the migration generator, which creates and populates the file based on the arguments provided.
Notably, however, the migration generator does not run the migration itself, which gives us an opportunity to inspect and edit the migration file before it runs.
Let's capitalise on this now and create a basic migration:
$ bundle exec rails generate migration CreateTodos name:string ## following plural convention-
bundle exec rails- specifies that we are using the Rails executable in thebindirectory of our app. -
generate- tells Rails we are spinning up a generator for it to work some magic. -
migration- which type of generator to use. This migration type is actually one of a few invoked when we run the model generator (we'll touch on this later in the guide). -
CreateTodos- our first argument to the migration generator itself, and is very clever:-
The
Createprefix tells the generator that we want our migration to create a new table. -
Because we used the prefix above, the generator knows that
Todosmust be the name of the table that we want to create (which will becometodosbecause, as we know, DB tables aresnake_case).
-
The
-
name:string- tells the generator to add anamecolumn to our table and render it as astring(< 256 characters).-
We can pass as many of these column arguments as we want to the generator in the format
column_name:value_type- for now, we'll just stick with the name. - Note that we can also run the migration generator without the column arguments, which will create a 'blank' migration file that only contains the default options and lets us fill it out manually.
-
We can pass as many of these column arguments as we want to the generator in the format
id column into each new database table which acts as the primary key for each entry -
a unique identifier that, in this case, records the consecutive number of each entry in the table.
Because an ID is necessary for most databases to work, it doesn't actually appear in the migration file (and therefore cannot be removed).
If we look in the db/migrate directory now, we should see the migration file that was created by this generator
(e.g. 20240321185804_create_todos.rb).
Inspecting the contents of the file will reveal the magic we have harnessed, with the change method showing the elements and values
we specified in the generator.
You'll see that the generator automatically adds a timestamps entry into the migration file as well,
which tells the database table to create columns to track when each new entry to the table is created and updated,
unambiguously named created_at and updated_at respectively.
Unlike the id column, we can remove this if we do not wish this to be recorded (though it is recommended that you leave it in).
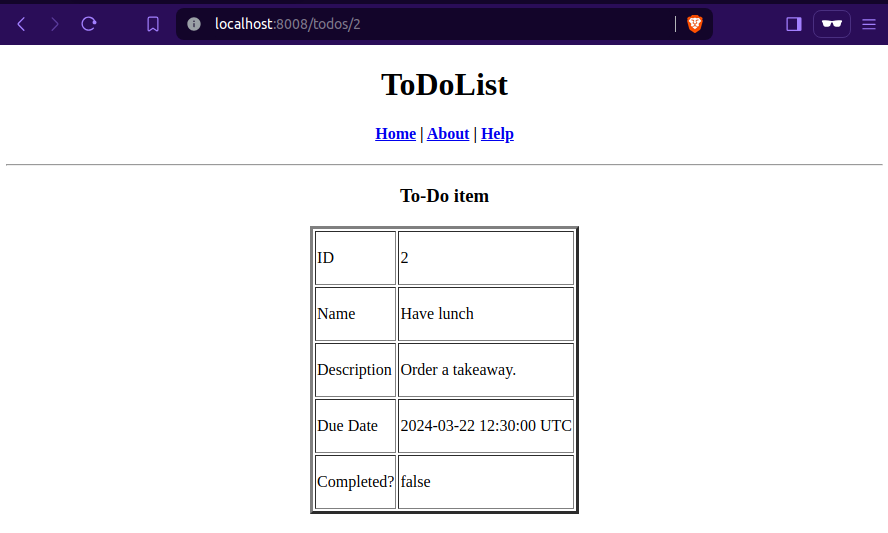
So far, all our migration is doing is creating a name for each Todo entry.
As we haven't actually run the migration, and we've got the file open, let's add a description column to our database table to give us more information on each entry:
Our migration file now contains all of the columns that we want to record in our DB table, for now at least. With this prepped, we can go ahead and run this migration to create our table using another piece of Rails magic, thedb/migrate/##############_create_todos.rbclass CreateTodos < ActiveRecord::Migration[7.1] ## version number matches Rails version def change create_table :todos do |t| ## name of our DB table t.string :name ## name column is string value (<256 chars) via generator argument t.text :description ## description column is text value (unlimited chars) t.timestamps ## automatic created_at and updated_at columns (datetime value) end end end
db:migrate job:
$ bundle exec rails db:migrate ## older Rails versions (<5) will run as: $ rake db:migratedb/migrate in alphabetical / numerical order and run each migration that is has not already executed,
meaning that if we generate several migrations without changing the filenames then Rails will migrate them in the order they were generated.
In this instance, Rails has created our
todos table and added an entry to db/schema.rb with the details!
WARNING:.
Our dizzying success with our first database migration may make us tempted to delete the migration file to tidy up.
Do not delete the migration files, as they will be necessary to set up the database in every other environment we spin up
(primarily when we deploy our application to a production environment).
The migration files are also used in the event we need to roll back a migration, which we will cover in the section below.
It is important to remember that Rails will not re-run migration files it had already migrated, meaning that we cannot edit the same file to add more columns once we have triggered the migration. If we do need to edit our database structure, there are a couple of option available to us.
The first option is to roll back the migration, which is essentially an "undo" for the most recent migration.
This is simply achieved by running the db:rollback job - let's do this now to see it in action:
$ bundle exec rails db:rollback ## roll back the most recent migrationdue_date column to our table by editing the migration file:
We can now re-run thedb/migrate/##############_create_todos.rbclass CreateTodos < ActiveRecord::Migration[7.1] ## version number matches Rails version def change create_table :todos do |t| ## name of our DB table t.string :name ## name column is string value (<256 chars) via generator argument t.text :description ## description column is text value (unlimited chars) t.datetime :due_date ## due_date column is datetime value t.timestamps ## automatic created_at and updated_at column (datetime value) end end end
db:migrate job to trigger a migration using the edited version of the original migration file, which will create our
todos table again and give it the fields we've supplied in the edited migration file.
While rollbacks are a valid, and sometime vital, option for changing the database, there are several factors which make them highly discouraged
unless absolutely necessary. First among them is the fact that a rollback works as an "undo" for only the last run migration file, meaning that if you need to undo a change
made several migrations ago then you'll need to undo a lot of actions which could potentially be very destructive.
Other reasons to avoid migrations where possible include the fact that each development environment will need to carry out the same actions as above (rollback, edit and re-migrate),
which is at best a pain and at worst a recipe for immense confusion (particularly if you are collaborating with others in developing your applications).
The more preferable option is to generate a new migration file.
Again, we can get the migration generator to essentially write the migration for us by confirming to convention and passing it arguments that it can work with.
Let's get the generator to create yet another column in our database table to track whether a Todo entry has been completed or not:
$ bundle exec rails generate migration AddCompletionToTodos completed:booleancompleted:boolean),
but has also very cleverly extracted the table that we want to add this to from the name of the migration (AddCompletionToTodos).
Because we are declaring a boolean, it makes sense to set a default value for each new entry - assuming adding a new item to a to-do list means that it hasn't been completed yet, let's set this default value to
false:
With that little tweak, our migration to add the new column is ready to go - we can simply run thedb/migrate/##############_add_completed_to_todos.rbclass AddCompletedToTodos < ActiveRecord::Migration[7.1] def change add_column :todos, :completed, :boolean, default: false end end
db:migrate job again:
$ bundle exec rails db:migrate ## will skip the already-executed migration(s)
I'm aware that we've only used migration files to add columns to tables, as well as create the table itself. However migrations are extremely versatile and offer a wide range of functions, including (but not limited to):
- Changing column names and value types.
- Removing columns entirely.
- Specifying column ownership / references.
For now, with our database set up with our todos table and all the columns we want for our entries, we can progress onto actually populating it!
Before we do that, let's push our migration files up to GitHub to preserve our database structure
- don't worry, this doesn't upload the database itself, only the migration files that let Rails set it up:
$ git add -A
$ git commit -m "Database migrations for todos"
$ git push
Comments
Post a Comment