[ToDoList] Data FUNdamentals
In order to allow Rails to interact with the database (DB) tables to create and manipulate entries in our database, we need to introduce the M in MVC: models.
Similarly to controllers, these are Ruby classes that inherit functionality from a core Rails element - in this case we are inheriting from ActiveRecord
(which is generally abstracted to ApplicationRecord in more recent versions of Rails).
Because of this, similarly again to our controllers, most of what we need to do here is simply define the model
- so long as it is valid and it follows the required convention, Rails will be able to figure the rest out itself!
Remembering that models must be named for the singular of the table we migrated, let’s create our model in app/models/todo.rb:
That's it! Because we have followed convention, Rails will recogniseapp/models/todo.rbclass Todo < ApplicationRecord ## will be ActiveRecord::Base in older Rails versions end
Todo as a valid class
and map all of the corresponding database table columns as methods that we can run against objects we create with it!
Rails can now fully able to interact with our DB table, let's explore and add some entries to it.
To do so, we will use the Rails Console.
This is essentially a Ruby console just like irb that automatically loads in all of the valid controllers and models that we have created in our app,
and allows us to test our code before we add it to our app.
Let's access it with:
$ bundle exec rails console
## As with the server command, Rails will allow an abbreviation of this to save your fingers
$ bundle exec rails c
Wait a few seconds for this to load up, and you know you are ready to go when you see irb(main):001>.
We can immediately test if our model is valid by running:
irb(main):001> Todo.all
=> []#all against a model's class will retrieve all entries in the corresponding DB table
- the fact it is returning an empty array ([]) shows that there are no entries in this table,
and therefore no stored Todo objects to display, which is what we expect at this point.
If we had run this before creating our model, or if our model was invalid, we would receive an error such as:
NameError (uninitialized constant Todo)
An additional check we can run, that will specifically ensure we have configured our database table columns correctly, is to generate a new Todo object:
> Todo.new
=> #<Todo id: nil, name: nil, description: nil, due_date: nil, created_at: nil, updated_at: nil, completed: false>completed
field is the default value we configured (false) - we can therefore be reasonably confident that our table and model are working correctly.
Note that creating a new object in this way will not add a new entry into the database
- we are just creating a temporary Todo object in memory.
This is made clear by the fact that the automatic id & created_at fields have a value of nil,
meaning they are unpopulated.
This essentially means that we have no way of accessing that object again.
The way that we can work around this without explicitly saving the object as a database entry is to assign the object to a variable
- let's do this now, and pass some basic values to the #new action while we're at it:
> section = Todo.new(name: "Complete Data Fundamentals section", description: "Learn things!")section variable, we will see the object we've created with the populated fields we specified:
> section
=> #<Todo id: nil, name: "Complete Data Fundamentals section", description: "Learn things!", due_date: nil, created_at: nil, updated_at: nil, completed: false>id and timestamp fields are unpopulated, showing that this object has no corresponding entry in the database.
Because we are working with a Ruby object, and our Rails model has automatically mapped all of the columns as methods, we can also check this more specifically:
> section.id
=> nilTodo being lost to us forever because we haven't stored the values in the database.
Let's go ahead and correct that by saving our object to the database table:
> section.savetrue to confirm that the save action was successful.
Just like that, we have our first Todo entry saved into our database!
If we call our variable again, we can now see that the object has an automatically-generated
id of 1,
as well as the two timestamp fields:
> section
=> #<Todo
 id: 1,
 name: "Complete Data Fundamentals section",
 description: "Learn things!",
 due_date: nil,
 created_at: Sat, 16 Mar 2024 00:26:16.333318000 UTC +00:00,
 updated_at: Sat, 16 Mar 2024 00:26:16.333318000 UTC +00:00,
completed: false>> section.id
=> 1Todo entries:
> Todo.allTodo entry!
That was so much fun, let's create another one quickly - we'll even populate an additional field for added joy:
> lunch = Todo.new(name: "Have lunch", description: "Make a sandwich or something.", due_date: Time.now.midday)
> lunch.save
> Todo.all
=>
[#<Todo
  id: 1,
  name: "Complete Data Fundamentals section",
  description: "Learn things!",
  due_date: nil,
  created_at: Sat, 16 Mar 2024 00:26:16.333318000 UTC +00:00,
  updated_at: Sat, 16 Mar 2024 00:26:16.333318000 UTC +00:00,
  completed: false>,
 #<Todo
  id: 2,
  name: "Have lunch",
  description: "Make a sandwich or something.",
  due_date: Sat, 16 Mar 2024 12:00:00.000000000 UTC +00:00,
  created_at: Sat, 16 Mar 2024 00:34:27.970980000 UTC +00:00,
  updated_at: Sat, 16 Mar 2024 00:34:27.970980000 UTC +00:00,
completed: false>]todos table, each with their own unique id primary key.
However this wouldn't be Rails if we couldn't streamline this process slightly, so let's add another entry using the #create method:
> correspondence = Todo.create(name: "Check email", description: "See who's talking to us.")#create has created the object and written the values directly to our DB table, negating the requirement to explicitly save the object from a variable.
We can check this either by calling the varible that we declared when running the action (
correspondence) to see its valid id,
or by simply checking the most recent Todo entry in the database's todos table:
> Todo.last
=> #<Todo
 id: 3,
 name: "Check email",
 description: "See who's talking to us.",
 due_date: nil,
 created_at: Sat, 16 Mar 2024 00:41:23.452432000 UTC +00:00,
 updated_at: Sat, 16 Mar 2024 00:41:23.452432000 UTC +00:00,
completed: false>Let's take a quick breather - go ahead and close your Rails console session and grab another cup/can of your chosen energy-boosting beverage:
> exit(Unfortunately the shell doesn't provide the same easy shortcut for getting a drink - not even the
Tab key works).
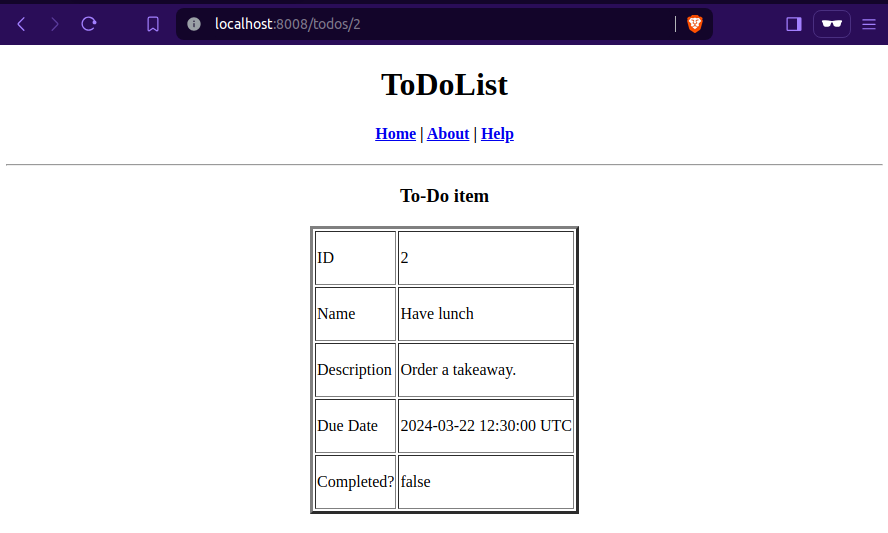
For your hard work (and because I feel bad about the Tab thing), I think you deserve to order something in for lunch.
Let's edit our lunch Todo entry to reflect this.
However, as mentioned previously, when we open a new Rails console, the variables we defined in the previous session aren't preserved:
$ bundle exec rails c
> lunch
(irb):1:in `<main>': undefined local variable or method `lunch' for main (NameError)
We can either bring up the list of all of our
Todo entries and search for the id of the one we need
and assign that to a variable with #find:
> Todo.all
> lunch = Todo.find(2)name or the description or other value,
we can use #find_by to locate the entry using this:
> lunch = Todo.find_by(name: 'Have lunch')description to reflect our new plans:
> lunch.description = "Order a takeaway."    ## change the value of lunch field
> lunch                                      ## check the object
> lunch.save ## save our changesTodo item, and indeed any database entry using Rails!
If we check the entry's
updated_at value:
> lunch.updated_at
=> Sat, 16 Mar 2024 00:44:56.912482000 UTC +00:00
Similarly to when creating new entries, Rails offers a method to streamline updating entries as well - the unambiguously named #update action.
Let's avail ourselves of this now to update the due_date of our lunch entry, and give ourselves an extra bit of time to look at the menu:
> lunch.update(due_date: lunch.due_date + 30.minutes)due_date
instead of generating an explicit Time object.
I don't know about you, but I'm having too much fun with this to bother checking my emails today - let's delete this entry:
> Todo.all                            ## list our entries and find our entry
> correspondence = Todo.find 3        ## assign our entry to a local variable
> correspondence                      ## double-check it's the right entry
> correspondence.destroy              ## remove the entry from the DB
> Todo.all ## check the entry has been removedThe output of these final two commands should confirm that the database is deleting the specified entry from our
todos table,
and then that the table no longer contains the object we deleted. No one is going to distract us from this guide today (apart from our tasty lunch)!
Now, there are some things that Rails will not automatically do out-the-box, and one of these is data validation.
This is an intentional move, as the developers of Rails do want to restrict the ability for entries to have a null value outside of the essential database table columns
(e.g. id).
To see what this means for us, let's create a new blank Todo object in the database:
> Todo.create
=>
#<Todo
 id: 4,
 name: nil,
 description: nil,
 due_date: nil,
 created_at: Sat, 16 Mar 2024 00:53:34.407571000 UTC +00:00,
 updated_at: Sat, 16 Mar 2024 00:53:34.407571000 UTC +00:00,
completed: false>todos table that has neither a name nor description, which is all but useless to us in our to-do list.
Notice that the output shows this blank entry has an
id of 4,
despite the fact that we had previously deleted the entry with the id of 3.
This is important to remember: the primary keys cannot be overwritten and persist regardless of whether or not their entry has been deleted.
We could delete this entry to get rid of it, but let's update it to make it useful instead:
> Todo.find(4).update(name: "Tidy up", description: "Clean the desk.")Notice here, as we as well when ran
#create to generate the blank entry, we do not necessarily have to assign an entry to a variable to perform actions on it.
We can ensure that this doesn't happen again by adding some simple data validation to our Todo model
to ensure that each new entry has at least a name - we'll expand this to also include a maximum length for good measure.
To achieve this, we need to exit the console and add the required configuration inside the Todo class
in app/models/todo.rb - when we're done it should look like something like this:
Breaking down what we've done here,app/models/todo.rbclass Todo < ApplicationRecord ## will be ActiveRecord::Base in older Rails versions validates :name, presence: true, length: { maximum: 200 } ## make name required, limit length to 200 chars end
validates is the ActiveRecord method we are calling to configure the validation.
We are then passing multiple arguments to this method:
:nameis specifying the column we want validation for, passed in symbol syntax.presence: trueis enforcing that this field must be populated.length: { maximum: 200 }is specifying we want to validate the field length and which parameters to validate by.
$ bundle exec rails c       ## access rails console
> todo_validate = Todo.new  ## create object
> todo_validate.save        ## attempt to save object
=> falseThe
false boolean was only returned by the #save method when we tried to write the blank value to the database
- based on this, we can assume that our validation works.
However there's that old saying about assumptions. If we want to be absolutely certain that this save failed because of our validation,
or we were to get this output in a scenario where we were not specifically expecting this to fail, the returned output of false isn't particularly helpful.
We can instead get more information as to why the save failed by adding a ! to the method and instead run #save!:
> todo_validate.save!
/usr/local/bundle/ruby/3.3.0/gems/activerecord-7.1.3.2/lib/active_record/validations.rb:84:in `raise_validation_error': Validation failed: Name can't be blank (ActiveRecord::RecordInvalid)Validation failed: Name can't be blank we can see here shows that is indeed our validation preventing Rails from saving a blank entry!
It is important to know that almost all errors experienced by a Rails object, such as the error above, are objects themselves.
These error objects are stored in an array within the object that experienced the error, and can be retrieved using the #errors method against it:
> todo_validate.errors
=> #<ActiveModel::Errors [#<ActiveModel::Error attribute=name, type=blank, options={}>]>attribute (the name column that raised the error)
and the error's type - in this case showing that the attribute was blank.
We can extract a slightly more user-friendly error message for these error objects by running
#full_message against the specific error object
we require it for - in this example, the error object we want is the first (and only) object in the #errors array:
> todo_validate.errors.first.full_message
=> "Name can't be blank"
And with that we have reached the end of this section! This is by no means a comprehensive outline on what Rails can do with databases, but it will suffice for what we want to achieve with our app.
If you would like to learn more about what else can be achieved, I hugely encourage you to check out the ActiveRecord pages on the
Ruby on Rails Guides mentioned at the start of this guide.
This includes stuff like:
- Convention overrides
- Bulk table entry updates
- Magic migration generation
As a final celebration of our good work here, let's push our changes to GitHub.
Again, this won't upload the database entries to the site, only the model we created in this section:
$ git add -A
$ git commit -m "Learned about ActiveRecord and made a model"
$ git push
Comments
Post a Comment