[ToDoList] Front-end Basics
So we now know how to get Rails to perform all of the CRUD actions required to run an application with user data from the console.
The next step will be to make this possible from the browser,
and allow Todo items to be created, read, updated and deleted from our lovely website!
We already have our basic database and our model set up from our efforts in the last section,
so we only need to configure some routes and create a controller & some views to make our dream of front-end database manipulation possible.
Let's start just by showing a Todo entry on a page on the site.
We will need to utilise a bit more magic here, specifically in the form of param(eter)s
- these are Ruby Hash objects that contain data to be passed between various components of the Rails application.
In this case we will be extracting the id of the Todo entry we want to view from the URL path
and additing it to this params hash.
As you may have guessed, because we are extracting this value from a URL path, we first need to configure the route for this URL,
which we do in config/routes.rb (below our other routes):
So here we are telling Rails that if a URL is requested that matchesconfig/routes.rbget '/todos/:id', to: 'todos#show'
/todos/X,
to consult the #show action of the TodosController and
pass the value of X to the controller as params[:id].
Let's quickly check that Rails recognises our new route:
$ bundle exec rails routes
         Prefix Verb   URI Pattern                        Controller#Action
           root GET    /                                  pages#home
          about GET    /about(.:format)                   pages#about
           help GET    /help(.:format)                    pages#help
                GET    /todos/:id(.:format)               todos#show
Unlike our previous controllers where the methods were 'empty', we now need to create a controller with a #show action and
tell it what to do with the data being passed to it via the params hash.
In this case, the controller is going to be searching the todos DB table for
the entry with the same id as is being passed to it via params[:id],
then it need to assign this entry to an instance variable (denoted by the @ prefix) so that it can be passed to the view later on.
Remembering our conventions, let's create our new controller in app/controllers/todos_controller.rb and add our #show action:
With the data from the requestedapp/controllers/todos_controller.rbclass TodosController < ApplicationController ## inherit functionality from the master controller def show @todo = Todo.find(params[:id]) ## find object and assign to instance var end end
Todo entry assigned to the @todo instance variable,
we can now call this same variable and use the object like we did in console from within a view.
First we need to create a directory in the
views directory to house it (remembering snake_case and pluralisation):
$ mkdir app/views/todosapp/views/todos/show.html.erb.
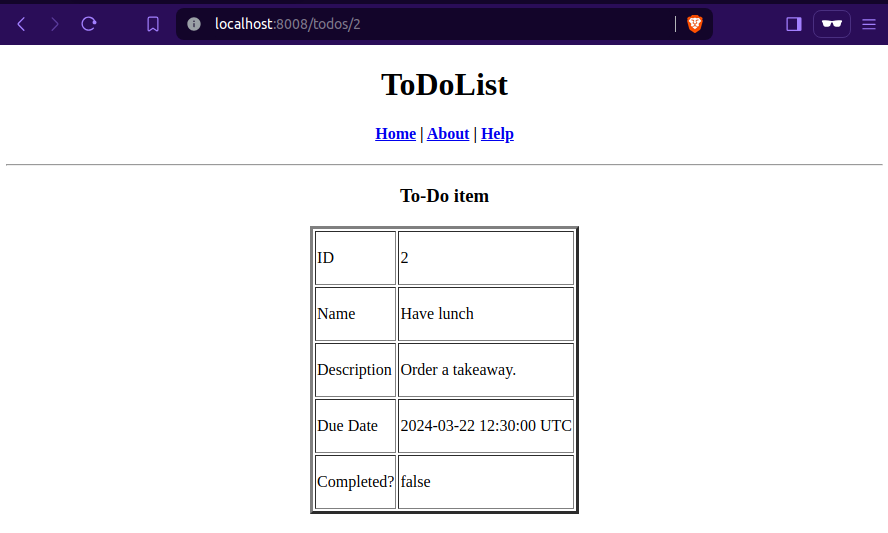
Inside this view, we will extract the values from the @todo variable and put in in an HTML table to present them to the user:
Now we can go to our browser (starting the Rails server if it isn't already) and navigate to aapp/views/todos/show.html.erb<div align="center"> <h3> To-Do item </h3> <table border="3"> <tr> <td><p> ID </p></td> <td><p> <%= @todo.id.to_s %> </p></td> </tr> <tr> <td><p> Name </p></td> <td><p> <%= @todo.name %> </p></td> </tr> <tr> <td><p> Description </p></td> <td><p> <%= @todo.description %> </p></td> </tr> <tr> <td><p> Due Date </p></td> <td><p> <%= @todo.due_date.to_s %> </p></td> </tr> <tr> <td><p> Completed? </p></td> <td><p> <%= @todo.completed.to_s %> </p></td> </tr> </table> </div>
Todo with a valid ID to see the corresponding object's data in the front-end!
(e.g. http://host/todos/2, where host is your environment's address / URL, e.g. localhost:3000).
That was pretty painless, right? That's our read functionality sorted (the R of CRUD). The next step is C, create, where we will add new DB entries via the front-end!
As before, we'll start with the route we need.
However this time, instead of explicitly typing out the route, we can take a more arcane approach and get Rails to generate all the routes we need for us with the resources notation!
This tells Rails to configure routes for all of the standard CRUD actions for the controller name it is passed - in this case :todos.
Back in /config/routes.rb, let's delete the previous line we entered and replace it with the notation above, so that our file looks like:
Rails.application.routes.draw do
  root 'pages#home'
  get '/about', to: 'pages#about'
  get '/help', to: 'pages#help'
  resources :todos
endTodo entries from the front end!
$ rails routes
                    Prefix Verb   URI Pattern                Controller#Action
                      root GET    /                          pages#home
                      home GET    /home(.:format)            pages#home
                     about GET    /about(.:format)           pages#about
                      help GET    /help(.:format)            pages#help
                     todos GET    /todos(.:format)           todos#index
                           POST   /todos(.:format)           todos#create
                  new_todo GET    /todos/new(.:format)       todos#new
                 edit_todo GET    /todos/:id/edit(.:format)  todos#edit
                      todo GET    /todos/:id(.:format)       todos#show
                           PATCH  /todos/:id(.:format)       todos#update
                           PUT    /todos/:id(.:format)       todos#update
DELETE /todos/:id(.:format) todos#destroyresources notation
- these are extremely useful for directing traffic through our site, and will be used quite heavily later in this section!
With our route generated, we need the functionality to actually use it - to do so we will go ahead
and create a #new action in the TodosController:
  def new
    @todo = Todo.new
endTodo object we 'accidentally' saved earlier,
the controller can now pass an empty Todo object (via the @todo instance variable)
to its corresponding view (but won't save it yet, as we can't do that any more!).
In that view, the user will require a means of actually adding data for us to save into our object and DB table,
which we can achieve easily by passing the @todo instance variable to Rails' form_with helper.
This is a funky little helper that will generate all of the code to securely submit data through a form,
so long as we provide it with the required arguments.
form_with syntax in Rails 6 differs to its predecessor (form_for), so even if you have created forms using Rails
before it is worth paying close attention here - not least because form_with actually submits data using AJAX by default
as opposed to the standard HTTP POST used by earlier iterations (if none of this made sense to you, please don't worry!).
When we initialise our form, we need to pass it the instance variable we generated the in new action before via the model tag.
Because Rails is very clever, this is all it needs to grab the model information, the URL to direct the request to and the method to send it!
Additionally, as mentioned above, we will need the flag local and set it to true to use local HTTP POST.
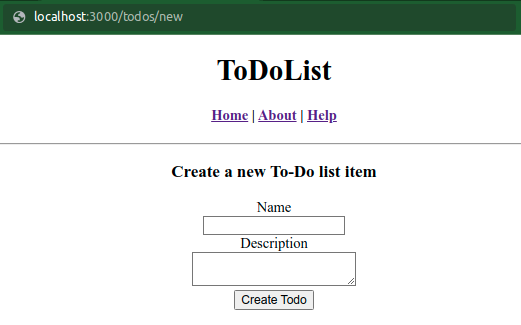
With this in mind, let's create our view now in /app/views/todos/new.html.erb:
<div align="center">
  <h3> Create a new To-Do list item </h3>

  <%= form_with model: @todo, local: true do |td_form| %>         <!-- using '=' erb tag -->

    <div>
      <%= td_form.label       :name %>            <!-- specifying form field & its value -->
      <br />
      <%= td_form.text_field  :name %>
    </div>

    <div>
      <%= td_form.label     :description %>              <!-- label of description field -->
      <br />
      <%= td_form.text_area :description %>               <!-- area to enter description -->
    </div>

    <div>
      <%= td_form.submit %>                         <!-- submit the data to @td variable -->
    </div>

  <% end %>                                                      <!-- end the Ruby block -->
</div>
But if you try to fill this in and submit a new entry, you get an error!
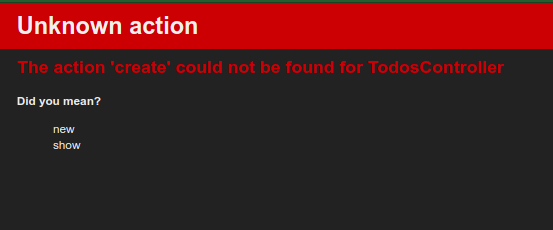
If we look at our routes, we can see that the POST route (in the Controller#Action column expects an
action at todos#create, which we don't have defined in our controller!
Feel free to curse at this juncture, or indeed any other juncture.
We therefore need to add some logic to the TodosController under a new #create method to
grab the submitted form data (that is captured in the params hash) and add a new entry to the database table with it.
Additionally we will need to add a redirect to this action to tell Rails where to send the user if the To-Do item saves successfully, for which we will use
the prefix for the todos#show route and append it with _path to create our path helper:
todo_path. We can then pass our @todo instance variable to it so Rails can provide the correct URL.
And if we're providing a redirect for a successful To-Do item submission, we should also account for an unsuccessful one.
This is as simple as calling the render helper and passing it the action to perform - in this case, new
The final point we need to take into consideration with our #create action is the potential security vulnerability if a malicious user
were to submit extra form fields to overwrite other data in our database. Luckily Rails will actually prevent this submission going through because it cares about your data,
however we will need to take steps to lock down the params submitted by the user via the form.
To do this we will create a private method to explicitly permit (whitelist) the parameter values that we need, and filter out everything else.
Wow, that was a lot of reading with no coding. Let's rectify that and put everything we've just read together to write our #create action:
  def create
    @todo = Todo.new(todo_params)
    if @todo.save                                        ## if the save is successful
      redirect_to todo_path(@todo)                       ## use prefix for todos#show
    else                                                 ## if the save is unsuccessful
      render 'new'                                       ## show same form if db refuses
    end
  end

  private                                                ## THIS CONTROLLER ONLY
    def todo_params
      params.require(:todo).permit(:name, :description)  ## whitelisting params fields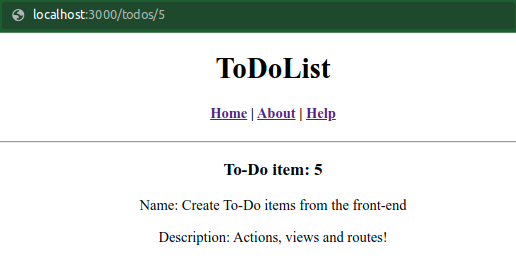
endTodo entry in http://host/todos/new,
it successfully adds this to the database and redirects to the show view!
However if this entry is not valid (i.e. no name), we are only telling the application to show the same form again, which is not hugely useful to anyone…
As we learned earlier, each Rails object saves any errors it has encountered in a nested object inside the object itself,
that we can retrieve with the #errors action.
Let's use this to add some error reporting. We will check to see if any errors exist and, if so,
display these errors on the new view
- back into /app/views/todos/new.html.erb (under the heading but above the form):
<div>
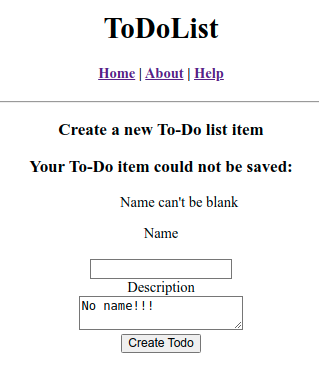
<% if @todo.errors.any? %> <!-- check if any errors present -->
<p>
Your To-Do item could not be saved: <!-- if yes, display the messages -->
<ul>
<% @todo.errors.full_messages.each do |msg| %> <!-- for all @todo err messages -->
<li> <%= msg %> </li> <!-- display message in list -->
<% end %>
</ul>
</p>
<% end %>
</div>
Let's go one further, and add a confirmation message if the submitted form was successful.
To achieve this we can use another piece of built-in Rails functionality called flash which, similar to params,
is a Hash of temporary data but is designed to have data explicitly added to it as opposed to relying on Rails to grab it from URLs or form data.
We can replace the if block in the #create method of the
TodosController class with the following (observant readers will see that we are actually only adding one line):
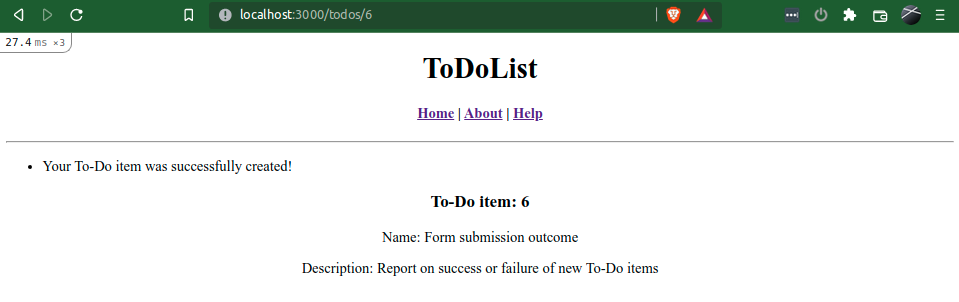
    if @todo.save
      flash[:notice] = 'Your To-Do item was successfully created!'  ## add msg to flash
      redirect_to todo_path(@todo)
    else
      render 'new'
endflash elsewhere in our app as well,
so just adding it to the new view probably isn't going to be very helpful in the long run.
Let's preempt this and add the display of this message to the template view that we added our nav bar to earlier on
- this can be placed wherever you wish, but I would recommend putting it just above the yield tag.
Back into
/app/views/layouts/application.html.erb:
    <div>
      <% flash.each do |k, msg| %>     <!-- iterating a Hash, so specify key and val vars -->
        <ul>
          <li><%= msg %></li>
        </ul>
      <% end %>
</div>show view with a reassuring message that it was successful!
With this, we now have the ability to create To-Do items from the browser, informing the user if this was successful or not,
and show them to the user afterwards!
With this complete, we have achieved the basics of a front-end application, and you should hug a nearby plant for some appreciation of your new found skills! To celebrate, as always, lets push our updates to GitHub:
$ git add -A
$ git commit -m "Add functionality to create and show Todos from front-end"
$ git push
| < [ToDoList] Data Fundamentals | | | [ToDoList] More Front-end CRUD > |
| Back | ||

Comments
Post a Comment