[ToDoList] Styling the App
Our app is up and running and working rather beautifully, if I say so myself. However, it's not the prettiest thing in the world, I'm sure you'll agree. A lot of people are very fussy with web apps, and won't use them unless it conforms to their flawed benchmark of beauty.
This actually has a fair bit of logic behind this way of thinking - a legit business that wants to build a good customer base is going to put effort into creating a nice user interface for said customers. Conversely a dog shit looking app is more likely to be something created by a dodgy party looking for a quick and easy way of grabbing your money.
This section will explore how Rails handles the resources to beautify our web applications (HTML, CSS, JavaScript, etc) and the various options available to us in terms of styling. We will put this into practice in the next section with the use of a front-end framework to get our app looking as pretty as it can!
First Thing's First...
Now, before we touch anything vaguely styling related, we need to think about our Version Control.
So far we have been committing and pushing our updates directly into our main branch - this is permissible as we've only been dealing with the basics so far.
However, when working on new features / functionality on an app that already definitely works from its primary branch,
it is better practice to commit all code changes to a sandbox before they make their way to the primary branch (main in our case).
Luckily, git provides just what we need for this in the form of repository branches. These live inside the same repository but under a separate namespace,
which can be built, refactored and tested before they are merged into the main branch. This means that your production instance running off of the main branch will not be affected by new
code commits until you are certain it will actually work (particularly if your production platform automatically deploys new commits to main, like Heroku can).
So let's set up a branch that we will work in while we learn about and apply styling to our app, which is as simple as running the following command from your app root:
$ git checkout -b initial_styling ## or whichever name you like$ git push origin initial_styling ## or whatever you called your branchWhen you need to switch back to main, just make sure everything has been pushed to your new branch and then:
$ git checkout main ## switch back to main branch$ git status ## check current branch / file statusWhen you have eventually made your changes, tested your branch completely and are ready to merge your changes in the primary branch, this can be done using a Pull Request from the corresponding tab on your repository page on GitHub:
Selecting New pull request will open the interface for doing so, where you can select the base branch (where you want to merge to, i.e. main)
and the compare branch (where the changes are currently stored):
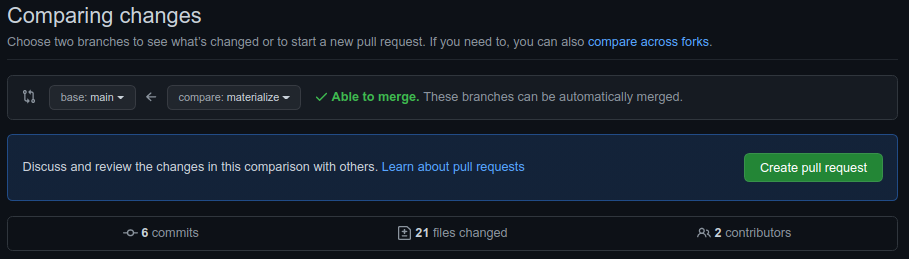
This will then indicate whether GitHub is able to automatically merge the compare branch into the base branch (if not it will provide an interface to fix any conflicts), as well as a list of the commits made
and files changed for you to check.
Once you are happy with this, you can select Create pull request to open the pull request's edit page:

Here you can add in a description of what our PR will do to the primary branch, assign it to the person responsible for it (probably you) and include any other GitHub viewers to review your work.
Other features like labels, projects and milestones can help to further categorise your work.
When you are happy with your request, selecting Create pull request will... create your pull request, which can then be merged into your main branch!
Anyway, for now all we needed to do was set ourselves up with a branch to work in, which we have done - we are now ready to get on with our styling!
Rails 6 Default Asset Management
Rails is very clever with how it handles styling.
You may remember when we were working in the application.html.erb template file, we had the following lines in our <head> block:
    <%= stylesheet_link_tag 'application', media: 'all', 'data-turbolinks-track': 'reload' %>
<%= javascript_pack_tag 'application', 'data-turbolinks-track': 'reload' %>application argument, is bring in the CSS/Sass stylesheets from the asset pipeline via the primary stylesheet
(/app/assets/stylesheets/application.css), and the JavaScript libraries from the local webpacker repository via the manifest
(/app/javascript/packs/application.js) - in Rails 5, before webpacker was standard, JavaScript was also brought in via the asset pipeline using a javascript_include_tag.
Observant as you are, I'm sure you also noticed that, when we used the generators to create our controllers (either using the controller generator or the scaffold),
these automatically generated stylesheets named for the controller in the asset pipeline (e.g. todos.scss).
By default, Rails will import all of the styles that reside in the same local directory as the application stylesheet due to
the following line in the default stylesheet (application.css):
*= require_tree .If instead you would like to use different styles for different controllers without the use of classes, this can be achieved by:
- Removing the
*= require_tree .line from theapplication.css -
Adding the following line to
application.html.erb, below the existingstylesheet_link_tag:<%= stylesheet_link_tag params[:controller], media: 'all', 'data-turbolinks-track': 'reload' %>
There's always a but...
As I'm sure you know by now, Rails has removed JavaScript from the asset pipeline, and in Rails 7 has done away with it altogether. It is therefore extremely beneficial that we can move the default stylesheets and whatnot that Rails provides us away from the asset pipeline, and get webpack to manage them instead.
One major drawback of this approach is that it takes away our ability to use controller-specific stylesheets in our pages. However many would argue that, if one wanted different styling for different areas of the app, doing this via different CSS classes is much better and cleaner anyway.
Webpack is a bit of an enigma compared to friendly sprockets and its asset pipeline, and the many hours Googling revealed many different approaches to achieving it with only a very small success rate.
However with enough impact between my face and my keyboard I've got the basics of setting oneself up with it for managing CSS and static assets (e.g. images):
We will firstly need to create the relevant directories withinin the Webpack structure to house our assets:
$ mkdir app/javascript/styles
$ mkdir app/javascript/images
Next up we will copy all of our
scssstylesheets (i.e. the ones Rails made for us with generators, any custom sheets, etc) from our asset pipeline to the Webpack directory - if you don't have any or aren't bothered about keeping them, you can skip this step:
(If this errors out then that means there were to$ mv app/assets/stylesheets/*.scss app/javascript/styles/scsssheets to copy, so we don't need to worry!)We will do the same thing for any images we had stored in the asset pipeline, moving them to the Webpack directory:
$ mv app/assets/images/* app/javascript/images/In order for Webpack to use any of our styles, we will need to import them using a master/primary stylesheet within Webpack styles directory:
In this file we can then import each of the stylesheets we copied over one-by-one (if you have no other sheets or don't want to import them, skip to the next step).$ touch app/javascript/styles/styles.scss
For example, if I had copiedtodos.scssandpages.scss:
Remember that we will need to refactor any CSS in these files to work by class, otherwise each stylesheet's styling definitions will simply overwrite the previous one's.@import 'todos'; @import 'pages';The only file in the existing asset pipeline stylesheet directory should be the standard
application.cssfile. In order for Webpack to play with styling (in my testing at least), this needs to be moved to the Webpack JavaScript packs directory:
Note that we need to copy this file as opposed to move it because, while we are not using$ cp app/assets/stylesheets/application.css app/javascript/packs/application.csssprocketsor the asset pipeline, Rails will not correctly compile assets ifsprocketsis improperly configured.Now, the styles present in the
application.csswe just copied into the webpacker directory will be imported into the app's styling, however this is an extremely inelegant way of doing things. Instead, let's copy the CSS content from the file into our new primary stylesheet file in the Webpack styles directory, without the commented section or therequirelines from the file.
We can then blat the existing file so that it simply exists as a placeholder for Rails to accept Webpack's dominion over styling:
(Again, if you had not added any CSS code to this file, this can be skipped completely).$ cat app/javascript/packs/application.css | grep -v '*' >> app/javascript/styles/styles.scss $ cat '' > app/javascript/packs/application.cssWe now need to tell Webpack to use our primary stylesheet that we created earlier (
styles.scss), which we will do using the manifest file at/app/javascript/packs/application.js. While we are here, we will also tell it to make any files available from theimagesdirectory we created earlier on.
To achieve this, we simply add the following lines below the existingimportlines in theapplication.js:require.context('images', true) import 'styles/styles'The final step (thank God) is to tell the actual HTML pages to use the styles being managed by Webpack as opposed to the asset pipeline, using the
application.html.erbtemplate.
Remember thestylesheet_link_tagwe mentioned above? All we need to do is swap it out for astylesheet_pack_tag- the line inapplication.html.erbshould therefore read:<%= stylesheet_pack_tag 'application', media: 'all', 'data-turbolinks-track': 'reload' %>
Each new change you make to the CSS will be freshly compiled by Webpack when your browser window is loaded up / refreshed for the first time afterwards - you might notice a brief delay while it does so, along with the accompanying notifier in the Rails server output:
[Webpacker] Compiling...
[Webpacker] Compiled all packs in /home/nask/projects/to_do_list/public/packs/app/javascript/images), and then referenced in the Javascript manifest, will be retrievable using an
image_pack_tag and passing it the filename. e.g.
<%= image_pack_tag('image.png', :alt => 'This image lives in the Webpacker image directory!') %>You are now set you up to create your own styles in JavaScript and CSS on your Rails app which, though obviously requiring fairly extensive knowledge of CSS and JS to carry out successfully, is very rewarding and impressive when pulled off correctly. There are numerous online resources to school oneself in CSS, Sass and JavaScript including, but not limited to:
Obviously general Googling will be your friend for anything specific you need to do (other search engines are available).
Holy Frameworks, Batman!
Unfortunately for us that are relative newcomers and/or only really interested in the back-end of development [insert "more of an ass man" joke here], the fairly substantial learning curve involved in writing all of the CSS and JS is a fairly prohibitive factor to our web development dreams. Never fear, however, because front-end styling frameworks are here to rescue you from the black hole of CSS styling!
There are lots of options available that vary hugely in ability and complexity. You might have heard of some of the barebones frameworks such as angular or reactJS, however for our purposes we will want a CSS framework that does a lot of the work for us. These include, but are not limited to:
- Bootstrap (most popular)
- TailwindCSS ("easiest" according to concensus)
- Materialize (my preference)
- Skeleton (lightweight)
- Foundation (also popular)
- SemanticUI
- Bulma
- Ease of use / installation
- Basic design format
- Degree of customisation
The best way to choose your first framework is to make a mockup of what you want your app to look like and then see which framework best fits this vision. There are several means of generating mockups / wireframes, from swanky tools like Balsamiq to free ones like Google WireframePro - or you could just use Paint/Pinta, or go full caveman and use a pencil and paper!
Because most of these frameworks rely on CSS and JavaScript. installation will be slightly different between Rails 5, which uses the asset pipeline and sprockets to handle JavaScript;
and 6, which uses webpacker - we will only be handling Rails 6 in this guide (which should also work for Rails 7).
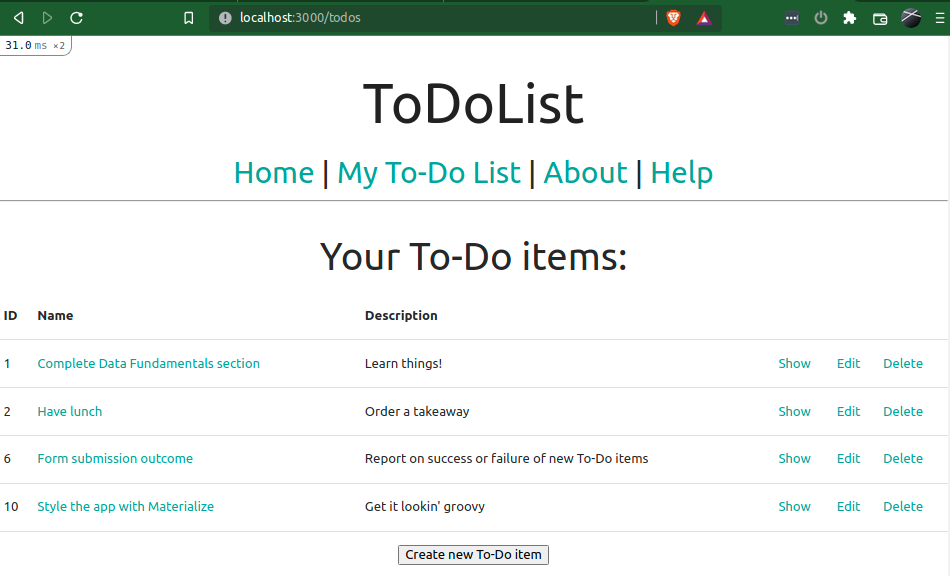
Because it is my favourite of those I have tried, in the next section we will use Materialize to style our ToDoList web app and get it looking as gorgeous and trustworthy as we can!
The methodology of how we use Materialize will be very similar to that of Bootstrap and the others, so even if you choose not to use Materialize it is still worth going through the section
and simply applying the same logic to your chosen framework.

Comments
Post a Comment